Ultralight Worthy Solar Panel and Power Bank Setup on My JMT Thru-Hike
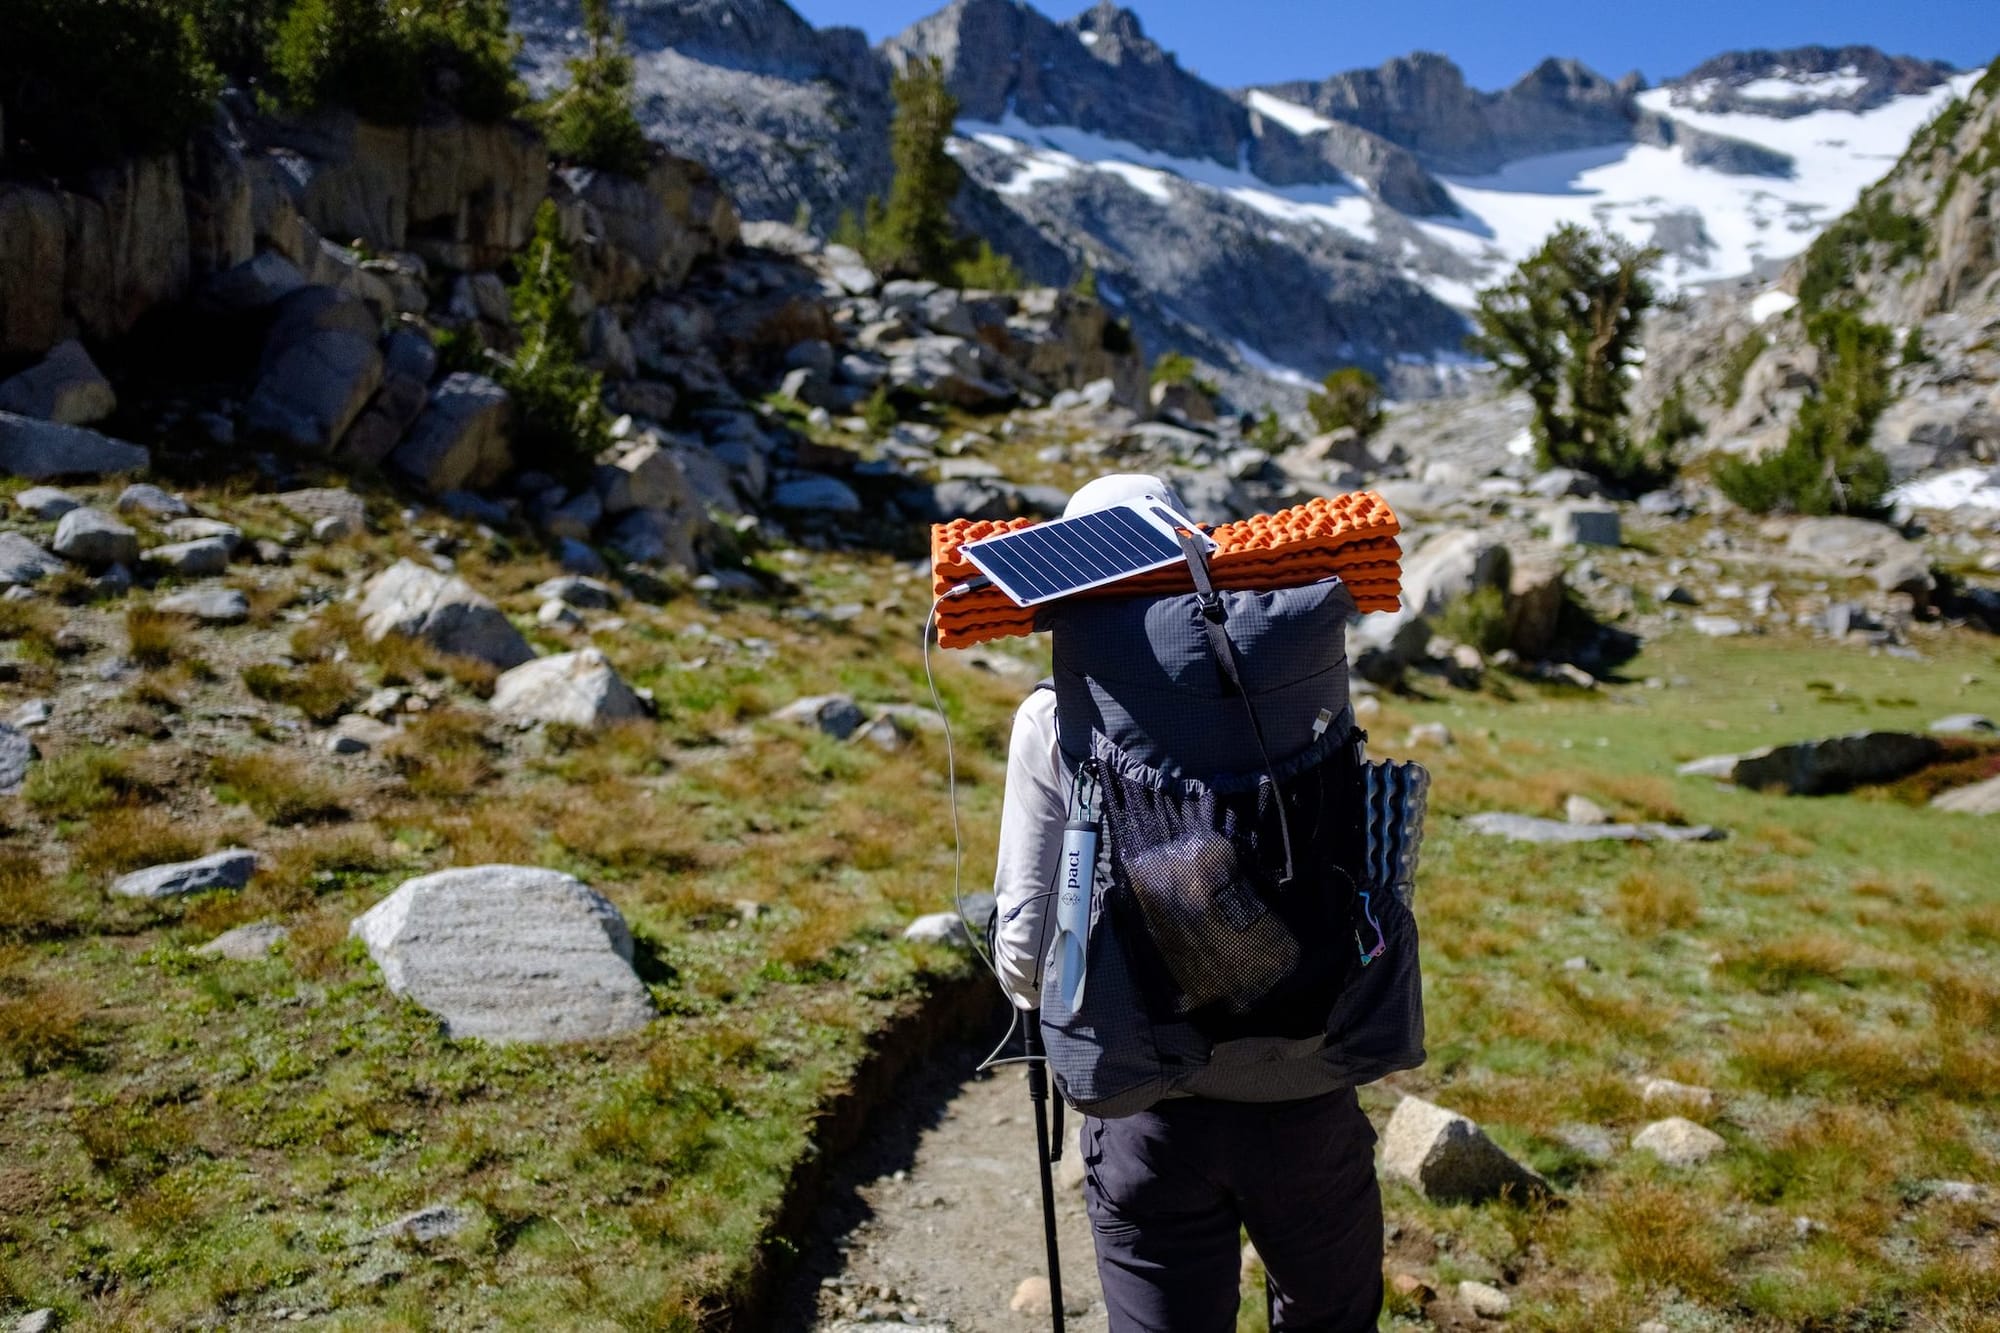
For our 17-day thru-hike of the John Muir Trail, we relied on a Lixada 10W solar panel and an Anker Nano 3-in-1 10,000 mAh power bank, which has a built-in USB-C cable and wall plug. This setup proved more than sufficient for two people.
During our planning of the JMT, my partner and I had some anxiety about power needs during our thru-hike.
We had a lot of electronics to keep charged and a long gap between wall outlets.
After some research, we settled with a solar panel and a 10,000 mAh power bank & wall plug combo.
We received many questions about the solar panel from other hikers, and we wanted to share our experience. We weren't alone in our anxieties—we met other southbound (SOBO) JMT hikers with similar power concerns, most of whom were carrying a 10,000 mAh power bank.
Hiking southbound, you will find outlets for the first ~100 miles (roughly 7-10 days) alongside the trail:
- Tuolumne Meadows — limited options at the Wilderness Center and General Store
- Reds Meadow — plentiful on exterior of the laundry & shower building
- Vermillion Valley Resort — plentiful outside the restaurant
- Muir Trail Ranch — plentiful outside the resupply pickup window
We planned to reach MTR on day 9, our last convenient charging stop along the trail. At our pace, this meant we wouldn't have outlet access for about eight days until we finish at the Whitney Portal trailhead.
Note: I didn't find any wall outlets from a quick search in Onion Valley when we resupplied.
We aren't staunch ultralight hikers and didn't want to spend too much money on new equipment. While there are opportunities to optimize further, I believe we arrived at a reasonable, cost-effective solution that worked well for our 17-day thru-hike.
The results of our experimentation and experience:
- Cut our charging system weight by almost a third — from 40 oz (1128 g) to 14.6 oz (414 g) while also reducing power anxiety
- Gave us plentiful power, allowing us to use our devices freely without feeling limited
- Significantly reduced charging time in "town"
Final Setup
- Lixada 10W solar panel — 3 oz (84 g)
- Anker Nano 3-in-1 10,000 mAh power bank — 9 oz (254 g)
- Built-in USB-C cable, one USB-C port, and integrated wall-plug
- USB-A to USB-C Cable — 0.35 oz (10 g)
- For iPhone 15, inReach, headlamps, and AirPods
- USB-A to microUSB — 0.35 oz (10 g)
- For camera
- USB-C to USB-A Adapter — 0.17 oz (5 g)
- USB-C to Lightning Cable — 0.7 oz (20 g)
- Apple Watch Charger — 1.05 oz (30 g)
Total Weight: 413 grams = 14.75 ounces
Our Electronics
- iPhone 14 Pro
- iPhone 15 Plus
- Garmin inReach Mini 2
- Apple Watch Ultra
- Camera (a small Fuji X100F point and shoot)
- 2 Nitecore NU20 Classic headlamps
- 2 AirPods Pros
Comparison
We initially considered a 20,000 mAh and a 10,000 mAh power bank. The two power banks alone weighed over two pounds at 34 oz (950 g). These are units we already owned and use in our everyday lives. They're not ultralight nor made out of carbon fiber (but at a fraction of the cost).
Adding a 90W wall plug and all of our cables to the setup resulted in a total weight of 40 oz (1134 g).
Even with 30,000 mAh of power, we still didn't feel comfortable making the 8-day stretch without an outlet. It would require some discipline with our electronics usage.
Using a 10,000 mAh power bank and 10W solar panel combination allowed us to cut our total charging system weight to under a pound at 14.75 oz (413 g).
Observations on Power Usage and Charging
Smartphones
Our phones were understandably our most power hungry devices. We used it for pictures, videos, note taking, and offline navigation with FarOut and Gaia GPS. Airplane mode and low battery mode were always on.
We often used the phones near full screen brightness because of the sun. We didn't disable auto-brightness.
My iPhone 14 Pro battery (3200 mAh) is a bit older and used about 30-40% battery each day. But this was the primary navigation device and was used to take a lot more photos and videos than my partner's phone.
The newer and bigger battery on iPhone 15 Plus (4400 mAh) fared better and used about 10-20% a day.
In optimal conditions, the solar setup charged the iPhone between 15-25% every hour.
I've read anecdotes and heard comments from other hikers that the fluctuating output from the solar panel may damage your expensive smartphone. We didn't have any issues.
That said, I typically used the solar panel when I was above tree line or otherwise exposed sections of trail. I unplugged my phone if I was weaving in and out of shade.
Garmin inReach Mini 2
The inReach Mini 2 has a 1250 mAh battery. The battery lasted longer than expected. Our daily usage pattern was as follows:
- 10-minute tracking intervals
- 5-10 text messages or check-ins
- Powered on for 10-12 hours (kept on even during extended breaks)
- Turned off the device after we set up camp and sent our evening check-in messages
The inReach Mini 2 was purchased new a few weeks before our trip and it depleted 10-15% every day.
I charged the device to full at VVR, topped it off again at MTR a couple of days later, and finished at Whitney Portal with 6% battery remaining.
We never had to charge the inReach outside of "town." But its small battery makes it a good candidate for solar charging.
Camera
My Fuji X100F has a 1200 mAh battery that I can charge through the camera with MicroUSB. The capacity is in-line with other similarly-sized point-and-shoot cameras. A typical full-frame mirrorless camera has about a 2000 mAh battery.
My aging X100F battery is good for about 500 photos per charge.
I exclusively solar charged it a handful of times during extended breaks and never found myself needing more power.
Apple Watch Ultra
I used my Apple Watch Ultra exclusively on low power mode, with no exercise or GPS tracking. I found the 72-hour battery life on low power mode to be accurate with my usage.
Smartwatch batteries are small. The AWU is less than 600 mAh. It charges quickly with solar, about 40-50% per hour in optimal conditions. I solar charged it during our daily extended swimming breaks and never worried about it.
Note: The Apple Watch Ultra series (36 hours) advertises a double battery life compared to the standard Apple Watch (18 hours) during regular usage. The battery life doubles in low power mode.

Headlamps
Headlamp batteries are tiny—the popular Nitecore NU20 has a 500 mAh battery capacity.
We rarely used headlamps. We consistently camped between 6-8 PM just around sunset time. There would be plenty of usable light even past 9 PM during our July hike.
Our only extended headlamp usage was during our four-hour summit up to Mt. Whitney starting at 1 AM. I charged the headlamps the day before using the power bank. I used 3% of the 10,000 mAh power bank to top off our Nitecore NU20 Classic headlamps.
Our headlamps likely saw less than 20 minutes of cumulative use each before our Mt. Whitney summit. We were so tired at the end of each day that we were falling asleep with plentiful of light outside.
AirPods
The AirPods Pro case along with the two earbuds have less than 600 mAh of capacity. The small capacity makes it ideal for solar charging.
We used our AirPods 3-5 hours daily, often during difficult climbs. They have an advertised listening time of about 30 hours.
We hiked only with one AirPod so we can communicate freely. This probably increased the effective listening time of at least 50 hours.
We charged it a handful of times during our trip. Sometimes with solar and sometimes with the power bank if we were feeling lazy.
Best Practices and Tips
- Keep your device as cool as possible while charging.
Things get really hot under the sun (duh!), even when the ambient temperature is cool. The solar panel will get hot, this is fine.
I tried hiding my phone behind the panel while charging. This wasn't sufficient and resulted in an overheated smartphone whose battery refused to accept any charge.
When I kept my devices cool, it made a noticeable improvement to charging speed.
You can tuck it behind a large rock or tree, or use something to insulate it from the heat, like some clothes or inside your backpack. - Position the panel perpendicular to the sunlight
Solar panels are most efficient when they are perpendicular to the sunlight. If possible, I'd grab a small vertical object (e.g., a twig), place it perpendicular to the panel like a sundial, and angled it until the shadow disappeared.
Re-adjust as needed as the Earth rotates. - Make sure the panel is not blocked by shade or debris
Solar panels work best when the entire panel is exposed to sunlight. A small obstruction will cause a proportionally larger drop in efficiency.
I looped my Y-strap through the panel handle, being careful not to block the photovoltaic cells. You may need to experiment with attachment styles if you plan to solar charge while hiking.
The trail gets dusty, so wipe it off often! - Reinforce the USB connector on the solar panel
The glue on the USB connector on my model of the Lixada solar panel is not strong, it seems to soften with the heat. You'll find reviews on Amazon with similar issues.
Ours came loose a week into our hike. We fixed it with some Leukotape. The adhesive on the Leukotape doesn't fare well in the heat, but it got us through the hike.
Some people recommend using epoxy or superglue to attach it more securely. We may try that next time.
Concluding Thoughts
The setup worked out much better than anticipated. I was frequently delighted to reach the other side of a mountain pass with my phone fully charged.
I've read many comments and posts saying that solar charging is not worth the trouble or the weight, and that I should just take the weight penalty of a reliable power bank.
But a $20 panel and $40 power bank kept us much happier than a 30,000 mAh worth of ultralight power banks that would've costed $150, weighed more, and still left us with power anxiety.
For such an exposed trail like the John Muir Trail and sunny California skies, we feel we could've gotten by on a smaller 5000 mAh battery.
Anker makes a 3-in-1 in the 5000 mAh size too but it's only marginally lighter (approximately 2 oz or 56g) than the 10,000 mAh version. The 10,000 mAh is only $5 more.
Other Rigs
Jeff Kessler (trailpeaches) has also wrote about his solar charging setup that weighs in at less than 8 oz (224 g). He uses a similar Lixada solar panel with a 21700 battery that charges via USB-C.
The setup is more involved with a few more parts like shock cord and angle adapters.
My only concern is that the 21700 battery would likely get too hot attached so close to the panel. He uses a small piece of closed-cell foam to insulate it from the heat. But there's simply not enough mass in the foam to insulate the battery properly when under the sun for hours.
Check out Jeff's Reddit post and discussion or on his blog post.